![]()
| |
| Carrier | |
| Health |
|
| Attack Damage |
|
| Found in | |
| [Source] | |
| “ | They don't call this guy, the Carrier for nothing. Make sure to concentrate your fire on it first and then take care of those pesky Flyers. | ” |
—Ground Zero Manual | ||
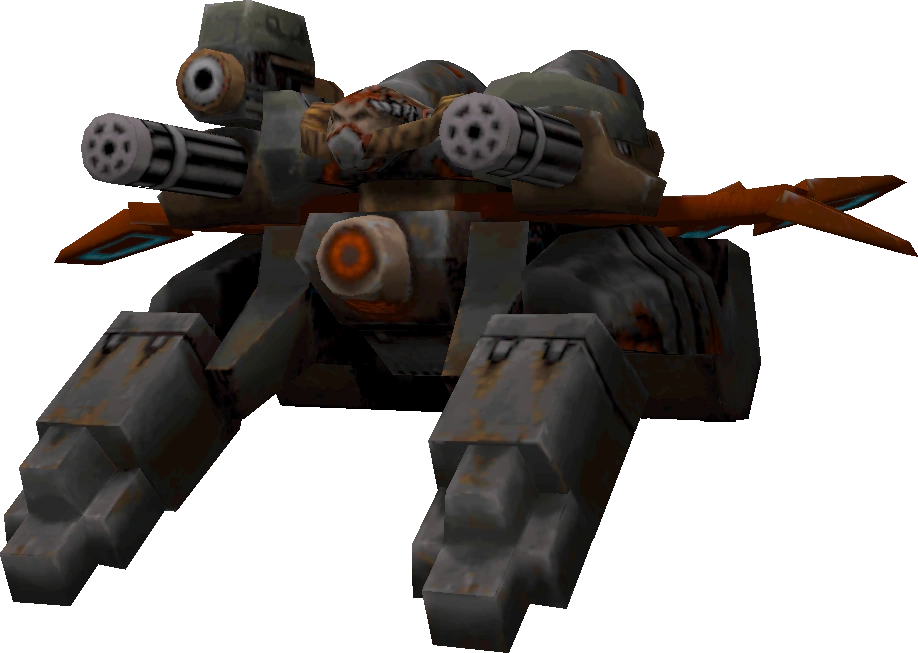
The Carrier is the first of two new bosses introduced in the mission pack Ground Zero. The Carrier is encountered in the Research Hangar at the end of Unit 3, guarding the Experimental Strogg Fighter. It has an array of weapons systems and has the ability to summon Flyers to assist it in battle. Furthermore, unlike most other Strogg, it has a higher amount of health on the harder difficulty settings.
In the Call of the Machine expansion, released as part of the 2023 remaster, three new boss enemies are essentially variants of the Carrier.
Behaviour and attacks[]
Twin Chain Gun: The Carrier's most common attack. The Carrier can lay down continuous fire, dealing 6 damage per bullet from each of the two Chain Guns. If a player continually strafes sideways, they can dodge most of the bullets but some of them are still likely to hit. A player that is not strafing sideways can expect to be hit by all of them.
Railgun: The Carrier's railgun is much like that used by a Gladiator - it aims at the player's position and then fires at that position a brief moment later, so it can be dodged by strafing. It deals 50 damage if it hits.
Grenade Launcher: The Carrier will launch 4 grenades in a volley, similar to the Gunner but with somewhat more accuracy at long range due to a better ability to adjust the angle they're fired at. Each grenade does 30-40 damage on a direct hit, and they deal splash damage as well. Like the Railgun, it can be dodged by continually strafing.
Quad Rocket Launcher: The Carrier's rocket launcher is on its underside, and it only tends to use this weapon if you move underneath or behind it. However, they fire in something of a spread, so they are difficult to dodge by strafing. It fires 4 simultaneous rockets, each rocket dealing 50 damage if it hits.
Summon Flyer: The Carrier has the ability to spawn Flyers into battle to assist it. The number of Flyers depends on the difficulty level - ranging from three at once on Easy, to up to six at once on Nightmare. If these Flyers are killed, the Carrier may respawn more from a seemingly endless supply. While Flyers are usually not all that much of a threat due to their low health and damage output, a player should be cautious of the potential damage six of them might inflict in addition to the weaponry of the Carrier, not to mention their distraction value.
Homing Flyer: As well as spawning Flyers into battle who behave normally, the Carrier will occasionally launch a Flyer which then flies directly towards the player, spinning violently and acting like a homing missile which explodes on contact, dealing 50 damage. The homing Flyer is difficult to dodge, but can be shot out of the sky before impact.
The Carrier's amount of health depends on the chosen difficulty level. On Easy difficulty, it has 2000 health - the same as a Hornet, whereas on Nightmare/Hard+ it has twice that much. The Carrier and its accompanying Flyers are not susceptible to infighting.
Strategy[]
Preparation[]
The Carrier is a formidable opponent, rivalling the Jorg and the Makron in terms of difficulty but coming second to the Black Widow Guardian. The Carrier is encountered the second time you visit the Research Hangar - the second visit to the level will start with a small safe room which contains an important secret (see the Research Hangar page), and the door beyond leads to the hangar where the Carrier awaits.
It's best to play Unit 3 somewhat mindfully so you'll reach the Carrier with what you need. The ideal combination of equipment is as follows:
- Chain Gun with the full 300 bullets
- Double Damage (last found in a secret area in the previous level, Maintenance Hangars)
- Power Shield (found in a secret immediately before the Carrier) and a decent number of Cells to power it
- Body Armor (one is found near the end of the previous level)
- Defender Sphere (last found in Waste Processing)
Hopefully you have an Invulnerability and Quad Damage in your inventory at this point as well. However, there aren't any more of those from now on, so you should not use the Quad Damage - it is much better to save it for the final battle against the Black Widow Guardian. Whether an Invulnerability should be saved for the Black Widow Guardian is debatable and depends on the difficulty settings (see the Black Widow's own page to read more) but it is not necessary against the Carrier. However, you CAN (and should) use a Double Damage for the Carrier fight, and a Defender Sphere is also a good idea, since you can find another one of each in Unit 4 to be used against the Black Widow Guardian. That said, the following strategies do work OK without a Defender Sphere if the player strafes enough to avoid most of the Carrier's fire.
The Battle[]
- The first thing you'll be confronted with as you open the door to the main hangar are two Flyers (on the harder difficulty settings; on the easier settings they won't be present). The Carrier won't emerge until after you pass through the doorway, so you may as well destroy these two Flyers from the other side of the doorway, before triggering the boss fight. The Carrier is going to be summoning more Flyers shortly regardless of whether these two Flyers are still here, so you can reduce the number a little by killing these two first.
- Before entering, make sure your Power Shield is switched on, equip your Chain Gun, activate Double Damage and Defender Sphere and enter the doorway. (Don't use an Invulnerability or Quad Damage - see the "Preparation" paragraph to read why). The best way to win the fight is to lay into the Carrier with the double-damage Chain Gun, strafing all the while. As you enter the room, a ceiling section will explode and the Carrier will appear - start firing as soon as you see the ceiling section explode, so the Chain Gun will be spinning at full speed by the time the Carrier emerges. With Double Damage activated, it'll take 250 bullets to kill the Carrier on the hardest difficulty setting, so you're pretty much emptying your supply of bullets here (it takes fewer bullets on the easier difficulty settings). This process should end the fight in around ten seconds. If the Carrier is still alive by the time your Chain Gun is empty, you can finish the job with your choice of backup weapon - Double Damage will still be active.
- Strafing will avoid most of the Carrier's attacks (the railgun, grenade launcher, most of the Twin Chain Gun fire, as well as the hyperblaster fire from the summoned Flyers), but you can still expect to take some damage from its Twin Chain Guns. Its homing flyer attack, on the other hand, is unlikely to be dodged by strafing so when you see this attack heading in your way, you can divert your own Chain Gun to intercept it and destroy it before it hits you. Although some of the Carrier's Chain Gun bullets will still hit you, the combination of Body Armor, Power Shield and Defender Sphere means you'll survive. It is unwise to try to move underneath or behind the Carrier, since that will invite it to fire its Quad Rocket Launcher at you, which is difficult to dodge by strafing - it's safer to attack this foe from the front.
- As soon as the Carrier falls to the ground and starts exploding, turn your attention to any remaining Flyers and then you're done here.
- In the 2023 remaster, the new Disruptor weapon can be used instead of the Chain Gun; not only does it have a higher overall damage output, but it has the ability to repeatedly hurl its target backwards, even massive enemies such as the Carrier. If you continuously bombard the Carrier as soon as it appears from the hole in the ceiling, it can be repeatedly pushed upwards, preventing it from descending far enough to even see you. In this way, the boss fight can be ended quickly without taking a single scratch (it takes thirteen Disruptor shots to kill the Carrier on Hard+, assuming you used Double Damage). However, as effective as this tactic is, the Disruptor's ammunition is rather hard to come by, and it is better saved for use against the Black Widow Guardian, a more challenging opponent than the Carrier. However, there are three Ammo Packs and two pickups of Disruptor rounds to be found between the Carrier and the Black Widow Guardian, so if the player has the full 30 Disruptor rounds when they reach the Carrier and use Double Damage to kill it with 13 shots, they can replenish their Disruptor ammo in time to face the Black Widow Guardian assuming they don't use the Disruptor against anything else.
The Aftermath[]
Be sure to explore the room for pickups once the Carrier is destroyed. You can return to the previous room for 100 Bullets if you didn't pick them up already, there's a Plasma Beam which will help to replenish the cells used by your Power Shield, and you can also head outside and activate a bridge leading to the building on the other side of the lava canyon - the one you explored when you visited this level the first time, in case there are supplies there you didn't collect before. You'll also find a fresh Body Armor by the underground exit shuttle.
Appearance statistics[]
| Campaign | Any difficulty |
|---|---|
| Quake II | - |
| The Reckoning | - |
| Ground Zero | 1 |
| Quake II 64 | - |
| Quake II PSX | - |
| Call of the Machine* | 3 |
*The Strogg Carrier and Ancient Carrier are essentially the same as the Carrier but with differing health values, depending on the difficulty level. The Garbage Carrier is based upon the Carrier but it can spawn Stalkers instead of Flyers.
Gallery[]
")
")
")
")
| Quake II: Ground Zero | ||
|---|---|---|
| Organization | Terran Coalition of Man · Strogg | |
| Characters | Stepchild · Wonimal · Zor · Scar-funkle | |
| Enemies | Daedalus · Medic Commander · Stalker · Turret | |
| Bosses | Carrier · Black Widow Guardian | |
| Weapons | Chainfist · ETF Rifle · Plasma Beam · Proximity Launcher · Tesla Mine · Disruptor (2023 remaster) | |
| Powerups | Antimatter Bomb · Defender Sphere · Doppelganger · Double Damage · Hunter Sphere · IR Goggles · Vengeance Sphere | |