| “ | This particular canned meat tends to open you up instead. | ” |
—Quake Manual | ||
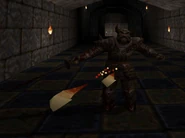
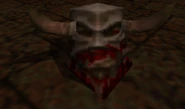
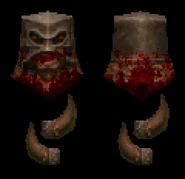
In Quake, a Death Knight or Hell Knight resembles a large warrior in a fierce-looking, blood-flecked suit of armor with a horned helmet and mask. It has a sword and can also cast a spread of fireballs, giving it a ranged attack. After its initial appearance in E2M3, the Death Knight becomes one of the most prominent Enemies in the game.
Strategies
- Much like the Knight, the Death Knight wields a blood-stained sword which he swings violently as he rushes towards the player. Each direct hit does up to 9 points of damage, but he performs multiple swings. Consequently, this Monster can easily deal lethal amounts of damage if the player is backed into a corner. To avoid this attack, keep back from the Death Knight whilst returning fire. Ranged attacks are the best way to take down a Death Knight.
- Death Knights also have a ranged attack where they launch six fireballs; these are generally spread in an arc formation as they move forward. Each individual fireball does 9 points of damage, which amounts to a bone-shattering 54 points if all of them hit. At close range it can be a bit of a hassle trying to dodge all of the fireballs, but the fireballs can be safely jumped over if they have spread too much to be dodged conventionally. If the fireballs do not make contact with anything within seven seconds, they disappear.
- Alone, the Death Knight shouldn't be too much of a challenge so long as you keep your distance and avoid the fireballs he shoots at you. It takes around five Super Shotgun blasts to take him out and its impact often causes the Death Knight to stumble, but they are fast enough to attack while you're reloading the gun. A better strategy might be to take out the Nailgun or Super Nailgun and begin firing. He'll stop often, allowing you to draw further back so that his sword won't reach you. From a safe enough distance, use the Rocket Launcher (or if that's unavailable, the Grenade Launcher ) and he'll be killed in three shots. The third shot usually gibs him.
- With other enemies, the Death Knight should probably be the first to go if there isn't a Knight or Fiend around. His speed will make him a constant distraction while you're fighting with other nearby creatures, so as with the Knight, it might be better to lure any Death Knights you're facing into a different area and focus on them before turning your attention elsewhere. That said, Death Knights are very useful for causing monster in-fights. The range and spread of their fireball attack often causes damage to other enemies, sometimes more than one at a time. Trying to trick them into provoking other monsters is a useful strategy even if you wind up getting injured yourself, as the damage inflicted by a single shot is very small. Death Knights are agile enough to kill most enemies in one-on-one in-fights, even against the Vore.
- The Death Knight can still injure a player, even if both are on opposite sides of a wall, when using his sword. Oftentimes, the Death Knight can be tempted to continue swiping after the player has hidden behind the wall, resulting in the player taking damage even though an obstacle exists between him and the Monster.
- It is possible to kill the Death Knight using the Axe at the cost of some health, though it can be handy if the player wishes to save Ammo.
Death Messages
- "Player" was slain by a Death Knight
Appearances
- E2M3: the Crypt of Decay
- E2M4: the Ebon Fortress
- E2M5: the Wizard's Manse
- E2M6: the Dismal Oubliette
- E2M7: the Underearth
- E3M3: the Tomb of Terror
- E3M5: the Wind Tunnels
- E3M6: Chambers of Torment
- E3M7: the Haunted Halls
- E4M2: The Tower of Despair
- E4M4: the Palace of Hate
- E4M5: Hell's Atrium
- E4M6: The Pain Maze
- E4M7: Azure Agony
- E4M8: the Nameless City
Trivia
- The Death Knight apparently was supposed to make a grunt when hit with a weapon, but this feature never made it into the game. The sound file still exists under "sound/HKnight/Grunt.wav".
Sounds
| Sounds | |
|---|---|
| The Death Knight spotting his enemy | |
| The Death Knight being aware of threat | |
| The Death Knight slashing his sword at somebody | |
| The Death Knight firing a fireball | |
| The Death Knight's projectile colliding with a surface | |
| The Death Knight grunting (cut from game) | |
| The Death Knight being injured | |
| The Death Knight being killed | |
| The Death Knight being gibbed | |
Gallery
| Quake | ||
|---|---|---|
| Characters | Ranger · Quake | |
| Enemies |
Death Knight · Enforcer · Fiend · Grunt · Knight · Ogre · Ogre Marksman · Rotfish · Rottweiler · Scrag · Shambler · Spawn · Vore · Zombie | |
| Bosses | Chthon · Shub-Niggurath | |
| Barriers and Hazards | Button · Door · Electric Terminal · Falling Spike · Guillotine · Lava · Laser Trap · Movable Wall · Nail Trap · Radioactive Container · Slime · Spiked Sphere · Teleporter · Unholy Altar · Water · Wind Tunnel | |
| Level Exits | Arch · Exit Gate · Rune Gate · Slipgate | |
| Powerups | 15 Health · 25 Health · 100 Health · Armor(Green)(Yellow)(Red) · Biosuit · Key · Pentagram of Protection · Quad Damage · Ring of Shadows · Rune | |
| Weapons | Axe · Shotgun · Double-Barreled Shotgun · Nailgun · Super Nailgun · Grenade Launcher · Rocket Launcher · Thunderbolt | |
| Ammo | Backpack · Shells · Nails · Rockets · Cells | |
| Source ports | GLQuake · GLQuakeWorld · QuakeWorld · VQuake · WinQuake | |
| Other | Crate · Dopefish | |

